
So much fun may be had, so many memories made, by each family project. For those of us with minds on church life, a project like this one we are posting today can really be a crafty way of introducing young people to the shape and styling of some old church buildings. And from a hands-on standpoint, this could be quite the involving process. Kids may have their own ideas as to color or detailing. In making it their own, this could turn into a keepsake to be brought out for every religious holiday, such as tomorrow's.
Some pointers will follow.
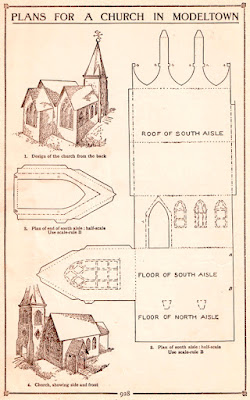
The plans seem simple enough. If you are a beginner at crafting, this might not be the most satisfying of the projects we offer here. My guess is, it might take weeks or a month of working at it a bit at a time, perhaps every weekend, before it could be completed, especially since the refinements of style and detail may take a while to decide for.
Our team suggests doing a mock-up first, like you would a muslin for a dress pattern you've yet to be sure of. Better to try it first than to regret wasting all the time and any materials you're using on something less than fun.
After all, if it isn't fun, it won't be remembered fondly, and that's what family project time is for, isn't it?
SOME SUPPLY IDEAS TO CONSIDER:
And what materials should you choose? Our guess would have to be card stock, over which you could layer an outside decorated version in a lighter weight of paper. Please experiment on this one. If you want to keep your project looking fresher, our suggestion would include leaving the glue stick for some other project, for it won't hold up, tending to dry out and lose its "oomph." Also, there is no replacement for two of the best and more essential craft tools around, your metal ruler (for more accuracy--standard school rulers often miss this and are out of alignment in ways which might spoil your fun), preferably cork backed, and your bone folder. I cannot stress this enough. They really are essential. And when every fold counts, you cannot be too careful!
COPYING & ENLARGING:
Personally, I always visit the copy center before embarking on such a creative journey, so I can make multiple copies cheaply, and have enough right on hand should accidents occur. This can save me time, and make things more pleasant overall. I relax better, just knowing I may have plenty of extra copies on hand. Also, there is no doubt the sizes of these sheets could stand enlarging! I'd recommend even cutting and pasting a simple sheet for reprinting of each of the patterns here. Simply cut away each building part from the pattern sheet, then glue each one to its own plain sheet. You can keep this one and use it to make multiple copies, especially if you're going to experiment with looks or color. But for enlarging, this could be a really important point to keep in mind.
PUTTING IT ALL TOGETHER:
I've found Mod Podge for Paper to be helpful, although I haven't tried it before on a project of this sort. A finer quality paste, rather than this liquid formula, will probably hold up better, dry more securely, even look better overall, as one may be spread fairly thinly, even close to edges where it would show. (You know I LOVE my Mod Podge--it's just a matter of what it's better for.) I prefer Liquitex brand Heavy Gel Matte Medium, while friends have touted Yes Paste to be quite good. It makes no difference, really. What matters most is the delicate joining of each foldable flap, so a hot glue gun isn't going to let you re-handle or nudge that extra 1/16" if you must. It is better to work cold, then.
And, if you're thinking of having your outer or decorative layer fastened well enough to that card stock, it might be best to sandwich your still damp work (lay flat--this would be prior to joining edges with flaps) between 2 sheets of wax paper, then weighting firmly using old books or something of the sort. That way, you're bound to have little problem over buckling and warping. Even a bread board works well. I generally leave things of that sort in a safe spot and at least as long as 24 hours before removing the weight.
AN OUTING:
Basic ideas on all the details that might add to the fun, might take the pressure off, could be to study the way churches look that are old fashioned like this one. It might be fun to go on a field trip, and perhaps take pictures with your children before proceeding. This way, everyone can have an idea of how they might like to see it turn out. Perhaps even a tour via computer might suffice in this case. Google "historic church architecture" or some such other wording. But for those times when a deeper knowledge may be available outside your home, obviously a family outing can't possibly be better for this project.
In the end, it's up to you to decide. If you haven't time for it today, it certainly could become a long term project towards the other high holidays throughout the year. I could even see a Sunday School class of some of the older children working on this with their teacher for a number of weeks, slowly building and talking about church architecture, what each portion means to church lore, the history of such buildings, and so on. It could be more about the learning process, even, than about the making.
As for that weather vane, LOL, that might turn out to be a little more complicated than these directions suggest. :) Although doll house artists may differ with me on this one a little.
Happy Creativity from all of us here at the Studio!
Rose
Note: We are including those Original Patina pages for the purpose of other forms of crafting, creating, such as journal-keeping, scrapbooking, collage making, and so on.


Some pointers will follow.
The plans seem simple enough. If you are a beginner at crafting, this might not be the most satisfying of the projects we offer here. My guess is, it might take weeks or a month of working at it a bit at a time, perhaps every weekend, before it could be completed, especially since the refinements of style and detail may take a while to decide for.
Our team suggests doing a mock-up first, like you would a muslin for a dress pattern you've yet to be sure of. Better to try it first than to regret wasting all the time and any materials you're using on something less than fun.
After all, if it isn't fun, it won't be remembered fondly, and that's what family project time is for, isn't it?
SOME SUPPLY IDEAS TO CONSIDER:
And what materials should you choose? Our guess would have to be card stock, over which you could layer an outside decorated version in a lighter weight of paper. Please experiment on this one. If you want to keep your project looking fresher, our suggestion would include leaving the glue stick for some other project, for it won't hold up, tending to dry out and lose its "oomph." Also, there is no replacement for two of the best and more essential craft tools around, your metal ruler (for more accuracy--standard school rulers often miss this and are out of alignment in ways which might spoil your fun), preferably cork backed, and your bone folder. I cannot stress this enough. They really are essential. And when every fold counts, you cannot be too careful!
COPYING & ENLARGING:
Personally, I always visit the copy center before embarking on such a creative journey, so I can make multiple copies cheaply, and have enough right on hand should accidents occur. This can save me time, and make things more pleasant overall. I relax better, just knowing I may have plenty of extra copies on hand. Also, there is no doubt the sizes of these sheets could stand enlarging! I'd recommend even cutting and pasting a simple sheet for reprinting of each of the patterns here. Simply cut away each building part from the pattern sheet, then glue each one to its own plain sheet. You can keep this one and use it to make multiple copies, especially if you're going to experiment with looks or color. But for enlarging, this could be a really important point to keep in mind.
PUTTING IT ALL TOGETHER:
I've found Mod Podge for Paper to be helpful, although I haven't tried it before on a project of this sort. A finer quality paste, rather than this liquid formula, will probably hold up better, dry more securely, even look better overall, as one may be spread fairly thinly, even close to edges where it would show. (You know I LOVE my Mod Podge--it's just a matter of what it's better for.) I prefer Liquitex brand Heavy Gel Matte Medium, while friends have touted Yes Paste to be quite good. It makes no difference, really. What matters most is the delicate joining of each foldable flap, so a hot glue gun isn't going to let you re-handle or nudge that extra 1/16" if you must. It is better to work cold, then.
And, if you're thinking of having your outer or decorative layer fastened well enough to that card stock, it might be best to sandwich your still damp work (lay flat--this would be prior to joining edges with flaps) between 2 sheets of wax paper, then weighting firmly using old books or something of the sort. That way, you're bound to have little problem over buckling and warping. Even a bread board works well. I generally leave things of that sort in a safe spot and at least as long as 24 hours before removing the weight.
AN OUTING:
Basic ideas on all the details that might add to the fun, might take the pressure off, could be to study the way churches look that are old fashioned like this one. It might be fun to go on a field trip, and perhaps take pictures with your children before proceeding. This way, everyone can have an idea of how they might like to see it turn out. Perhaps even a tour via computer might suffice in this case. Google "historic church architecture" or some such other wording. But for those times when a deeper knowledge may be available outside your home, obviously a family outing can't possibly be better for this project.
In the end, it's up to you to decide. If you haven't time for it today, it certainly could become a long term project towards the other high holidays throughout the year. I could even see a Sunday School class of some of the older children working on this with their teacher for a number of weeks, slowly building and talking about church architecture, what each portion means to church lore, the history of such buildings, and so on. It could be more about the learning process, even, than about the making.
As for that weather vane, LOL, that might turn out to be a little more complicated than these directions suggest. :) Although doll house artists may differ with me on this one a little.
Happy Creativity from all of us here at the Studio!
Rose
Note: We are including those Original Patina pages for the purpose of other forms of crafting, creating, such as journal-keeping, scrapbooking, collage making, and so on.
NOTE:
This set of images is a gift to the public, for use by anyone, and free.
Therefore, you are free to:
use them for private purposes, in projects and artwork. If for sale, kindly credit this site (that goes for the Modeltown House, too).
You are not free to:
repackage the set for sale or to take personal credit for all of this studio's work.
This project took hours and hours of precious time to complete. We did it for the love of offering free ephemera and projects for the public's use.
We respect the copyrights of others and hope that you will join us in the process.
Thank you.
Instructions
Page One Black & White
Downloadable Version HERE

Page Two Black & White
Downloadable Version HERE

Page 3 Black & White
Downloadable Version HERE

Page 4 Black & White
Downloadable Version HERE

Page 5 Black & White
Downloadable Version HERE

~*~
And, for those most interested in journaling, scrapbooking, or collage,
we offer the above in Original Patina.
**ORIGINAL PATINA VERSION**
Page 1
Downloadable Version HERE

Page 2
Downloadable Version HERE

Page 3
Downloadable Version HERE

Page 4
Downloadable Version HERE

Page 5
Downloadable Version HERE

Scanned Imagery courtesy PPS Archives
Free for Public Domain Use
17 comments:
love this project!!! thanks so very much! you share the most fabulous images!!!:) xo
You're welcome sweetie! Have fun!
Rose
What a terrific project,thanks for sharing.
Hugs, Amy
We'd love to know how it turns out, if anyone's up for the challenge!
Rose
Thank you for stopping by and letting me know my button was not working properly!
I really appreciate your comment.
I love these vintage pages. They are beautiful.
*hugs*
mo
Mo: it was our pleasure!
Have a great holiday!
Rose & Studio Friends
Thanks for sharing this download. I can think of several ways to use these patterns!
Finally! My follow button worked! I'm your newest!
Lindy: So glad you came by and found a thing or two you could use.
:)
Lindy: Thank goodness it did work! Welcome! we're glad to have you aboard.
Hi Rose,
I love, love this church project..I will definitely download it! Thanks so much for sharing it with us. And thanks for visiting with me for Pink Saturday.
Pink Sparkles,
Stephanie ♥
Stephanie: Hope it's a fun one for you to try!
Hugs
Rose
Just stumbled onto this site from pinterest and I'm in LOVE! Rose, I feel like a twit, but I've made several putz houses and would love to make the church and the other home...the problem is I have NO idea what a B ruler is or how to make these designs 'full-sized'. I converted to them to pdf...just don't know where else to go with it! Can you help? TY!
Hi Carmen! here I am over 2 years too late! Sorry to be so behind. You see, I had to put down blogging for a while. I am so gratified that you like my blog. I hope that you are enjoying it even today, following my return to blogging with more new posts.
:)
Super strona. Czy można wykorzystać pomysł dla siebie? Mój syn uwielbia modele. Zdzisława.
Super strona. Mój syn uwielbia modele. Zdzisława
Zdzislawa
Cześć. Dziękuję za pytanie o moje projekty papierowe. Możesz używać zarówno domu, jak i kościoła. Te elementy są domeną publiczną dla wszystkich.
Post a Comment